|
IntroductionSplashMoney is a personal finance application for Android, Mac OS and Windows that allows you to:
Installation
RegistrationThe Android version of SplashMoney is fully registered once you buy it. When you launch SplashMoney on the desktop you will be prompted to enter a registration code or to run in Trial mode. You may run the software for 30-days in full-functioning Trial mode. The Trial software and Registered software are identical. Once the trial period ends you must purchase and enter a registration code to continue using the software. You do not need to re-install the software. Simply enter a registration code and your Trial version will be converted into a Registered version and all data will remain intact. Quick Start
Accounts
Account View When you first launch SplashMoney on the handheld you are presented with the Account View. Several sample accounts will appear. You can edit these accounts or create new ones. SplashMoney supports the following account types:
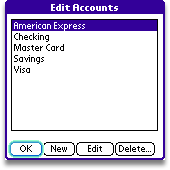
Editing Accounts You can add, delete and edit accounts in the Edit Accounts screen,
which is accessed by pressing the Menu button You may create new accounts by pressing the Menu button To edit an existing account, do one of the following:
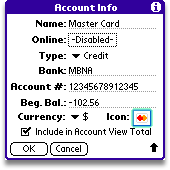
Account Info You can create an unlimited number of accounts. The Account Info dialog lets you enter the following information:
Online BankingSplashMoney can connect to many online banks using OFX "Direct Connect" technology. Ask your bank if you are able to use their online service with Direct Connect. They will probably want to hear that you are using it with Quicken 2005 or later, since many banks have business relationships with Quicken. But in most cases, if it works with Quicken, it will work with SplashMoney since we are employing the same technology. In order to use Online Banking on the handheld, you need an internet data plan - unlimited is recommended.
Note: In some cases the username/password you use to log into your bank's web-site is different than the username/password required for "direct connect" online banking as found in SplashMoney and Quicken. Check with your financial institution to see if you need a special username/password for direct connect online banking and whether any fees apply. Once you have set up an account for online access, you can tap the
Download button Note: When transactions are downloaded from your bank SplashMoney will attempt to match those transactions with any existing transactions in your register, or will add them as New transactions. The Online summary dialog (above) will show how many transactions are available from the bank server, how many match local transactions, and how many will be added as new. Previously downloaded transactions may be counted in the Downloaded category, but they will not be added as duplicates to your account register. RegisterOnce your are finished editing your accounts, return to the Account View and tap an Account to display its Register View. The Register view displays a list of transactions. The following navigation options are available in the Register View:
Menu OptionsMany functional commands are found in the menu options, which are accessed by pressing the Menu button on your device. The Account Register view has the most options: Accounts
Settings
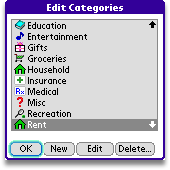
Edit Lists
About SplashMoney
Transactions
Amount: The amount of the transaction. Category and Class : You may enter a Category (e.g., Auto, Dining, Groceries, etc.) and/or Class (e.g., Personal, Business, etc.) in the Category field. You can also split a transaction over multiple Categories and Classes by selecting Split from the menu options. You may also transfer money to another Account by selecting the Account name enclosed in brackets (e.g., [Visa]) from the bottom of the Category menu (see Category Transfers). State: Select the state of your transaction: Uncleared if the transaction has yet to clear your bank, Cleared, Reconciled if the transaction has been verified against your statement, and Void to disallow the transaction (see Deleting Transactions). Memo: Enter a memo if you wish - such as who you were with for a dining charge. Three menu options are available in the Transaction Info dialog:
Transaction Types
Transferring funds between Accounts
Split Transactions
Multiple Currencies
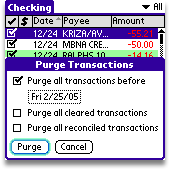
Deleting TransactionsSplashMoney provides several methods for removing transactions, each with unique characteristics, as follows: Deleting Transactions When you delete a transaction it removes it from your register and it is no longer calculated into your account balance. You should not delete valid transactions as it will alter your balance and potentially cause problems when reconciling. It is recommended that you purge valid transactions instead. You will find the Delete button at the bottom of the Transaction Info dialog. When you purge a transaction, it is removed from your register but your beginning balance is adjusted by the amount of the transaction being purged. The end result is that your ending balance will be unchanged even though the purged transaction is no longer listed in the register. For example, you can purge all cleared transactions or all transactions over 3 months old, and still have an accurate ending balance. You can purge transactions individually in the Transaction Info dialog, or in batches as follows:
If you void a transaction, the transaction will remain in your register, so you have a record of it, but its amount will be ignored and not calculated in your account balance. To void a transaction, select Void from the State menu in the Transaction Info dialog. Security
SplashMoney Desktop ApplicationWhen you first launch SplashMoney, you will see the SplashMoney Setup wizard. It will help you connect to your handheld in 3 quick steps:
When launch SplashMoney you are presented with the Accounts Pane on the left. Several sample accounts will appear. You can edit these accounts or create new ones. SplashMoney supports the following account types:
Account Info You can create an unlimited number of accounts. The Account Info dialog lets you enter the following information:
Online BankingSplashMoney can connect to many online banks using OFX "Direct Connect" technology. Ask your bank if you are able to use their online service with Direct Connect. They will probably want to hear that you are using it with Quicken 2000 or later, since many banks have business relationships with Quicken. But in most cases, if it works with Quicken, it will work with SplashMoney since we are employing the same technology. To set up online banking, open the Account Info dialog by double-clicking the account you wish to edit.
Note: In some cases the username/password you use to log into your bank's web-site is different than the username/password required for "direct connect" online banking as found in SplashMoney and Quicken. Check with your financial institution to see if you need a special username/password for direct connect online banking and whether any fees apply. Once you have set up an account for online access, you can click the
Go Online button Note: When transactions are downloaded from your bank SplashMoney will attempt to match those transactions with any existing transactions in your register, or will add them as New transactions. You will be prompted to Review the downloaded transactions and verify whether they are Matching or New transactions. RegisterTabs are used on the desktop to allow quick access to the Register, Reports, Budgets, and Reconcile tool. The Account View on the handheld application is constantly available in the Accounts pane on the left of the desktop application. |
||||||||||||||||||||||||||||||||||||||||||||||||||||||||||||||||||||||||||||||||||||||||||||||||||||||||||||||||||||||||||||||||||||||
 Edit Transaction Dialog |
Adding/Editing Transactions To create a transaction, click the New button Account: In the top right, you may select which account to add the transaction to. The default selection will be the account in which you initiated the transaction. Date: Date of transaction. |
Payee: The name of the Payee. You may enter a name or select from the popup list of memorized Payees.
Type: Type of transaction (check, deposit, withdrawal, ATM, etc.). Note: if you choose check#, the next check number will be automatically entered but you can change the check number if desired. You may also create custom transaction types (see Transaction Types).
Amount: The amount of the transaction. The amount is recorded
in your home currency, known as your base currency. You may enter a
foreign currency and its exchange rate by clicking the Currency Converter
button ![]() (see Multiple
Currencies).
(see Multiple
Currencies).
Category/Class: You may enter a Category (e.g., Auto, Dining, Groceries, etc.) and/or Class (e.g., Personal, Business, etc.) in the Category field. You can also split a transaction over multiple Categories and Classes by selecting SPLIT from the Category popup (Windows) or clicking the Split button (Mac OS). You may enter the Category and Class or select from the popup menus of memorized items. The Category menu appears on the left and the Class menu appears on the right. SplashMoney includes predefined categories and classes, which you can modify. You may also transfer money to another Account by selecting the Account name enclosed in brackets (e.g., [Visa]) from the bottom of the Category menu (see Category Transfers).
Memo: Enter a memo, or click the memo icon to enter more information.
State: Select the state of your transaction: Uncleared if the transaction has yet to clear your bank, Cleared, Reconciled if the transaction has been verified against your statement, and Void to disallow the transaction (see Balancing Accounts).
Delete: This button only appears when editing an existing transaction (see Deleting Transactions).
Purge: This button only appears when editing an existing transaction (see Purging Transactions).
Transaction Types
SplashMoney includes several built-in transaction types (check, deposit, withdrawal, ATM, etc.) and you can create additional custom transaction types. To create a custom transaction type, select Edit Transaction Types from the List Menu, click New, choose Deposit or Withdrawal and enter a name. Once you've created a custom transaction type, its name will appear in the Type popup menu in the Edit Transactions dialog.
Scheduled Transactions
SplashMoney supports Scheduled Transactions, enabling you to setup transactions that occur on a regular basis. Once you setup a Scheduled Transaction, you can choose to record it manually or be reminded when it's time to record the transaction.
Creating/Editing Scheduled Transactions
- Select Edit Scheduled Transactions from the List Menu. The Edit Scheduled Transactions dialog appears.
- Click New. The Edit Scheduled Transaction dialog appears.
- Enter the Account this transaction will affect from the Acct popup menu.
- Click the Date picker to open the Change Repeat dialog and specify the date and frequency of the transaction (see Repeat Frequency below).
- Complete the rest of the fields in the dialog (Payee, Type, Amount, Category, etc.) and click OK to complete the setup of the scheduled transaction.
Repeat Frequency
There are several options available for the frequency of Scheduled Transactions and how you want to enter them in your register, as follows:
Next Date: The date of the next (or first) occurrence.
Frequency: Monthly, Twice a month, Quarterly and so on.
Repeat: Select Indefinitely for a transaction that is ongoing (e.g., Cable TV) or # of Times for a transaction that occurs a specified number of times (e.g., car loan or mortgage).
Enter: Choose one of the following options for how you want the scheduled transaction to be entered into your account register:
- Manually: Requires you to manually record the transaction. To check for scheduled transactions, select Upcoming Transactions from the File menu.
- Remind Me: You will be prompted when you launch SplashMoney if there are any due transactions so you can manually record them (see Recording Scheduled Transactions below).
Recording Scheduled Transactions
Depending on how you choose to enter scheduled transactions you will receive one of the following alerts:
Scheduled Transactions prompt: If you have one or more transactions that are due you will be prompted to view them when you launch SplashMoney. If you click Yes, you will be taken to the Upcoming Transactions dialog where you can record them. If you click Later, you will be reminded again the next time you launch SplashMoney.
Upcoming Transactions dialog: You may view and record scheduled transactions by selecting Upcoming Transactions from the File Menu. The Upcoming Transactions dialog displays all scheduled transactions thru the date specified in the Thru popup menu. You may select a scheduled transaction and click one of the following buttons:
- Record All: Records all transactions currently in view.
- Record: Records the selected transaction.
- Edit: Opens the selected transaction where you can make a change (e.g., the amount or date) to that specific transaction and record it. Note: If you wish to edit all occurrences of the scheduled transaction you may do so in the Edit Scheduled Transactions dialog.
- Skip: Allows you to delete that specific occurrence of the scheduled transaction. Future transaction will still occur. Note: If you wish to delete all occurrences of the scheduled transaction you may do so in the Edit Scheduled Transactions dialog.
- Done: Closes the dialog.
Transferring funds between Accounts
 Transfer Dialog |
You may transfer funds between your accounts using one of the following methods. Transfer Funds Click the Transfer button Date: Enter the date of the transaction. From: The Account the funds will be withdrawn from. Amount: The amount of the transfer. To: The Account the funds will be deposited into. |
Cleared: Whether or not the Transfer is cleared. (Chances are the transfer has cleared your bank since they probably conducted the transfer. But you can always mark it as cleared later when reconciling your account.)
SplashMoney displays the name of each Account in brackets at the end of the Category list (similar to Quicken and Microsoft Money). This enables you to transfer funds to an account from within the Edit Transaction dialog. For example, when writing a check for your Visa bill, you could create a new transaction in your Checking account and select [Visa] from the Category popup. This will create a corresponding deposit in the Visa account in the same amount. These two corresponding transactions are dynamically linked and if you change the data in one, it will be reflected in the other.
Split Transactions
 Splits Dialog |
Transactions may be split across multiple categories, by selecting --SPLIT-- from the Category popup (Windows) or clicking the Split button (Mac OS). The Splits dialog will be displayed where you can select up to 10 categories to split the transaction across. Following are some examples of why/how you would perform a Split Transaction: | |||||||||||||||||
| Example 1: You write a check to your mortgage company that includes mostly interest and some principal. You want to track each separately in a Mortgage Liability account, and a Home Equity Asset account. |
|
|||||||||||||||||
Example 2: You bought some groceries with a debit card and withdrew additional cash. You want to track the amount you spent on groceries, and track the cash deposit in your Cash Account. |
|
|||||||||||||||||
Multiple Currencies
SplashMoney supports multiple currencies allowing you to track accounts in different currencies as well as recording individual transactions in different currencies and converting them to your account currency. You must specify a Base Currency, and all other currencies will have a conversion rate relative to the Base Currency. Each account can use a different Account Currency, but there is only one Base Currency. In the Accounts Pane, each account balance is displayed in its own currency. But the Total Balance (Net Worth) at the bottom of the Account View is calculated by converting each account total to the base currency and summing the account totals.
Editing Currencies
One currency must be defined as your Base Currency with a conversion rate of 1.0. All other currency conversion rates will be in relation to the Base Currency. Conversion rates are dynamically updated as you create new transactions and edit the Conversion rate in the Set Currency dialog, discussed below. To edit a Currency:
- Select Currencies from the List Menu.
- Specify one of the currencies as your Base currency by selecting it and clicking Base.
- Select an existing currency and click Edit.
- Enter a conversion rate. The conversion rate is relative to the base. For example, if your base is a dollar ($) and you want to enter the conversion rate for the Euro (E) and the conversion rate is 0.924275 Euros to the Dollar, the conversion rate is calculated by dividing 0.924275 Euros by 1 Dollar (0.924275/1) resulting in a conversion rate of 1.08193.
- Click OK.
Entering a Foreign Currency in a Transaction
While entering a transaction in the Edit Transaction dialog, click
the Currency Converter button  which appears to the right of the Amount Field.
- Select a Currency from the Currency Popup.
- Enter a Currency Amount in the From field.
- Enter the Conversion Rate.
- Click OK. The converted amount in your Account Currency appears in the Amount field.
Since conversion rates change daily, they can be edited while entering a transaction in the Convert Currency dialog. When you edit the conversion rate for a transaction, you are only editing the conversion rate for that specific transaction. It will not affect the conversion rate for any previously entered transactions. When you enter future transactions, however, the last conversion rate entered for that currency is recalled.
Balancing Accounts
You can balance your SplashMoney account so that it matches the closing balance on your bank statement using one of the two following methods:
Reconciling
|
Click the Reconcile tab and enter the beginning and ending balance from your printed bank statement. Check off each of the items that match your printed statement. You can return to the Register by clicking the Close button and add or modify transactions if there are missing transactions. Then return to the Reconcile dialog to pick up where you left off. Once you've marked all the items that match your statement the Difference displayed at the bottom should = 0. If it does not, SplashMoney will create an Adjustment transaction to reconcile the accounts. Click Done and the marked items will be marked as Reconciled in the Register. |
As a simpler alternative to Reconciling, you can easily change your Ending Balance by clicking the Ending Balance amount in the Register View and entering a new amount. When you do this, SplashMoney actually adjusts the Beginning Balance by the appropriate amount to get the Ending Balance to equal the desired amount. This method is the quickest and easiest way to make sure your SplashMoney register reconciles with your bank statement or a desktop application like Quicken or Microsoft Money, but it does not provide any record of the adjustment you made to the register.
A note about the difference between Balance and Cleared Ending balances:
- Balance: This is the total of all transactions in your register, both Cleared and Uncleared.
- Cleared Balance: This is the total of all Reconciled and Cleared transactions in your Register. These transactions have cleared your bank and should match your bank's online balance or your bank's printed statement.
Deleting Transactions
SplashMoney provides several methods for removing transactions, each with unique characteristics, as follows:
Deleting Transactions
When you delete a transaction it removes it from your register and it is no longer calculated into your account balance. You should not delete valid transactions as it will alter your balance and potentially cause problems when reconciling. It is recommended that you purge valid transactions instead.
When you purge a transaction, it is removed from your register but your beginning balance is adjusted by the amount of the transaction being purged. The end result is that your ending balance will be accurate even though the purged transaction is no longer listed in the register. For example, you can purge all cleared transactions or all transactions over 3 months old, and still have an accurate ending balance.
You can purge transactions individually in the Edit Transactions dialog, or in batches as follows:
Purge Before: As an alternative to purging all cleared or reconciled items, you may wish to keep several months worth of transactions on your handheld for your records. Using the Purge Before command you can purge transactions before a specified date. Note: Any items that are purged will be automatically cleared and your Beginning Balance will be adjusted so that the Ending Balance will remain accurate.
Purge Cleared: SplashMoney will remove the cleared transactions from your register and adjust your Beginning Balance by the total amount of the purged transactions, so that your Ending Balance will remain accurate.
Purge Reconciled: SplashMoney will remove the reconciled transactions from your register and adjust your Beginning Balance by the total amount of the purged transactions, so that your Ending Balance will remain accurate.
If you void a transaction, the transaction will remain in your register, so you have a record of it, but its amount will be ignored and not calculated in your account balance.
Reports and Charts
 Report View in Pie Chart Format |
SplashMoney will generate reports showing how you are spending your money over a specified period of time. Click the Reports tab to generate a Report. The default report shows spending by Payee for the last 90 days. You can generate reports based on Payee, Category or Class. Define Report You may customize the report by specifying which Accounts to include, the type of report (Payee, Category or Class), the time period, report type (Textual or Pie Chart), and the Amounts to be displayed (Income or Expenses.
|
Drill-down Report
In either the Report View or Pie Chart View, you may drill-down on any item in the report by double-clicking on it. For instance, if you are viewing a report by Category, you can double-click "Groceries" to generate a Drill-down report showing all the transactions that are assigned to the Groceries category in that time period.
Tip: You can find all the transactions that are not categorized by generating a Category Report and clicking the total for <Unassigned>. This will create a Drill-down report for all the Uncategorized transactions. You can then open each transaction and assign categories to them.
Budgets
 Budget View |
SplashMoney allows you to view reports comparing budgeted amounts to actual amounts. Click the Budget tab to open the Budget View. The default Budget shows spending by Category for the current month. You can create budgets for each Category, Class and Payee. Define Budget In the left pane, you can specify the Budget type (Payee, Category or Class), and the time period. |
Budget Amount
You specify the budget amount for each item (Category, Class or Payee) by clicking on the Budget Amount in the Budget column. This will open the Budget Amount dialog where you specify a monthly budget amount for that item.
Note: You may only specify a monthly budget amount for each item. When you are viewing a budget report for a time period of a Quarter, the monthly amount will be multiplied by three, and when viewing by a time period of a Year, the monthly amount will be multiplied by 12.
Drill-down Report
If you double-click the item name (Category, Class or Payee) in the Budget view, it will open the Drill-Down Report for that item. The drill-down report will show all the transactions associated with that item in that time period (Month, Quarter or Year).
Security
 |
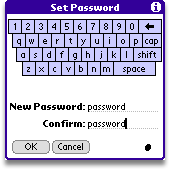
You can secure your data in SplashMoney so that a password must be entered to access the application. You will be required to enter the password when launching SplashMoney. Setting a Password -- Select Set Password from the File Menu. The Set Password dialog is displayed. Enter a password in the New Password field, and verify the password by entering it again in the Confirm field. Entering a Password -- You will be required to enter your password each time you launch SplashMoney. |
|
Changing a Password -- To change a password, select Set Password from the File Menu, enter your Old Password, then enter and confirm the New Password.
Removing a Password -- To remove a password, select Set Password from the File Menu, enter your Old Password, then leave the New Password and Confirm fields blank.
Import/Export
You can import QIF, OFX and CSV into the SplashMoney desktop. Select Import from the File menu to access these commands. SplashMoney can also export to QIF or CSV in order to backup and transfer data to other applications. Following is a description of these formats:
- QIF - The old Quicken format. Quicken 2005 exports to this format but will not import it.
- OFX - Also known as QFX (Quicken), Open Financial Exchange (OFX) is the standard recently adopted by Quicken, Microsoft Money, and many US online banks.
- CSV - Comma Separate Values; a widely supported text format that can be opened in spreadsheets such as Excel and text editors such as NotePad and Text Edit.
Importing data into SplashMoney from an online bank
Data (Transactions) may be transferred into SplashMoney by importing a QIF or QFX file. Most online banking institutions will allow you to export transactions in QIF or QFX format. To import data to SplashMoney from an online bank, do the following:
Download a QIF or OFX file - From your online bank, follow the steps necessary to download transactions in QIF or QFX format.
Launch SplashMoney - Open the SplashMoney Desktop and drag the QIF or QFX file into the Accounts Pane, or select Import from the File Menu. Then you must select an Account to import the transactions into or choose <New Account> to create a new account for the transactions.
Synchronization
Items may be created or edited on the Handheld or Desktop and the changes can be synchronized over your local WiFi network.
By default information is synchronized in both directions, but you can adjust the settings, in Android Sync settings which can be opened from the File menu.
Make sure if you change the sync settings away from Synchronize that you remember to change it back later when you want to do a normal sync.

Here are the possible sync settings and the results they will bring about:
- Synchronize -- Changes made on the Handheld or the Desktop will be synchronized. If a record is edited on both sides between syncs, both versions of the record will be kept so you can manually compare which one you want to keep.
- Desktop overwrites handheld -- All data on the Desktop is copied to the handheld. Any data on the Handheld will be replaced.
- Handheld overwrites Desktop -- All data on the Handheld is copied to the Desktop. Any data on the Desktop will be replaced.
In order to synchronize, you must do the following:
- Select the same network that your computer is on for your handheld to join
- Open the SplashMoney desktop
- Select the correct user from the User menu in the SplashMoney desktop to match the device name
- Set the passwords the same on both the desktop and handheld software
- Adjust the Android Sync settings in File > Android Sync if you wish
- Start the Sync on the handheld:
 1. Select "Sync" from the toolbar in the Home screen |
 2. Select your computer or enter an IP address to sync with |
 3. Tap "Start Sync" |
If your desktop computer cannot be discovered, it could be due to the following:
- The SplashMoney desktop is not running
- The wrong network is selected on the Android device
Try entering the IP address of the desktop computer manually in such cases. You can find this out by going to File > Android Sync on the SplashMoney Desktop.
If you have trouble connecting your handheld and desktop SplashMoney, or if you want to make your sync connection with the handheld more private, you can set up an Ad hoc network (aka Computer-to-Computer network), and then perform your sync with both devices on that network. Here's how:
Mac OS
- Click the Airport icon in the menu bar, and select Create Network.
- Select options for the network such as name and if you wish to password protect it.
- On the handheld, join the new network from the list in Settings > Wi-Fi.
- Now open SplashMoney on both the handheld and desktop and proceed with the Synchronization.
Windows Vista
- Open Connect to a Network by clicking the Start button , and then clicking Connect to
- Click Set up a connection or network.
- Click Set up an ad hoc (computer-to-computer) network, click Next, and then follow the steps in the wizard.
- On the handheld, join the new network from the list in Settings > Wi-Fi.
- Now open SplashMoney on both the handheld and desktop and proceed with the Synchronization.
This Vista setup information was gathered from this documentation Here you can find information on setting up an Ad hoc Network in Windows XP

