|
SplashID 3 User Guide

Table of Contents
Introduction
Installation
Registration
Quick Start
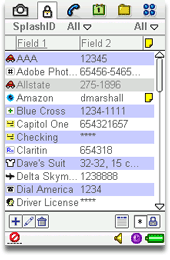
List View
List View Menu Options
Detail View
Detail View Menu Options
Edit View
Automatic Password Generator
Types and Categories
Custom Field Labels
Masking
Security
SplashID Desktop
Importing and Exporting
Backup and Restore
SplashID provides quick and easy access to all of your sensitive personal
identification information, including usernames, passwords, credit cards,
PINs, calling card numbers, frequent flyer numbers, insurance info and
more. Data is stored in a secure, encrypted, password protected format
and can be synchronized between SplashID on your Symbian UIQ phone and
SplashID on your desktop computer.
SplashID on the phone and SplashID Desktop are virtually identical.
This user guide focuses on the features in SplashID on the phone. You
may prefer to do most of your data entry in SplashID Desktop, however,
since it's faster and easier with a keyboard, and then perform a Sync
operation to synchronize the data with your phone.
Connect your device to your desktop computer. Run the Installer and
follow the on screen instructions. At the end of installation, the software
will install on the mobile device. The installer installs the following
files:
- SplashID.sis -- The application used to view and edit information
on the phone.
- SplashID Desktop -- A desktop application used to view and
edit information on the desktop.
- SDPlatformMgr.dll and PlatformSync.dll -- Extension
for the Desktop application.
- SplashID User Guide -- This User Guide.
When you launch SplashID you will be prompted to enter a registration
code or to run in Trial mode. You may run the software for 30-days in
full-functioning Trial mode. The Trial software and Registered software
are identical. Once the trial period ends you must purchase and enter
a registration code to continue using the software. You do not need
to re-install the software. Simply enter a registration code and your
Trial version will be converted into a Registered version and all your
data will remain intact. The registration code must be entered
in both the desktop application and the phone application.
Quick Start
- Launch SplashID and the List View will be
displayed with several sample records.
- Tap
 to create a new record. In the Add Item View select a Type,
such as Credit Card or Web Login, and you will see the Field
Labels change accordingly in the Fields tab.
to create a new record. In the Add Item View select a Type,
such as Credit Card or Web Login, and you will see the Field
Labels change accordingly in the Fields tab.
- Tap OK when you are finished entering the information for the new
record and you are returned to the List View.
- You can create records on the phone or the desktop and synchronize
the data between the two. You may find it easier to enter data in
SplashID Desktop where you can use your keyboard.
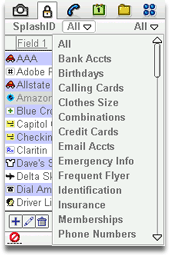
- Types -- Use the Type menu on the top left to filter the
view by type, such as Credit Cards or Web Logins. All Types are displayed
by default, but you may restrict the list to only display items assigned
to a specific Type (see Types and Categories).
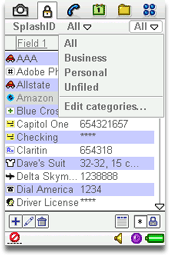
- Categories -- Use the Category menu on the top right to filter
the view by Category, such as Business or Personal. All categories
are displayed by default, but you may restrict the list to only display
items assigned to a specific Category (see Types
and Categories).
- Sorting -- Tap the column header to sort by that column.
Tap again to reverse sort. The sorted column is underlined.
- Resize columns -- You may resize a column by dragging the
left/right edges of the column header.
- These buttons appear at the bottom of the List View screen:
- --
Tap to create a new record.
 -- Tap to edit the selected record.
 -- Tap to delete the selected record.
 -- Tap to select which columns to display.
 -- Tap to show/hide masked fields; or press
the "*" key in flip closed mode.
-- Tap to show/hide masked fields; or press
the "*" key in flip closed mode. -- Tap to lock SplashID; or press the "#" key in flip
closed mode.
-- Tap to lock SplashID; or press the "#" key in flip
closed mode.
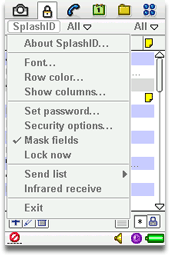
The List view contains the following menu commands:
- About SplashID -- Displays the version and registration code.
- Font -- Select a font style for the List View.
- Row Color -- You may select a custom row color for the List
View, or select white if you do not wish to have a row color.
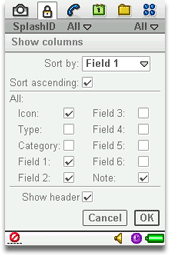
- Show Columns -- The Show Columns dialog lets you select the
columns to display in the List View; and whether or not to display
the Header Row. Note: The column settings are remembered for each
record Type. For example, you can show two columns when viewing Web-Logins
and three columns when viewing Credit Cards.
- Set Password -- Select Set Password to password protect SplashID.
See Security for more information.
- Security Options -- Security Options allows you to specify
a period of time after SplashID becomes idle before the application
locks and requires a password. See Security
for more information.
- Mask Fields -- Select this option to hide or show
the data in masked fields. You can also tap the
button or press the "*" button in flip-closed mode.
- Lock Now -- Locks SplashID immediately and requires a password
to open the data again. See Security for more
information. You can also Lock Now by tapping the button
or by pressing the "#" key in flip-closed mode.
- Send List -- Sends the records currently in view to another
device. Note: The recipient must be running SplashID in order to receive
the records.
- Infrared Receive -- Check this setting to receive
beamed records via IR.
|
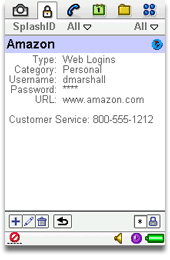
Tap an item in the List View to view its details in the Detail
View. Each item can contain up to 6 fields, an icon, plus additional
notes.
|
|
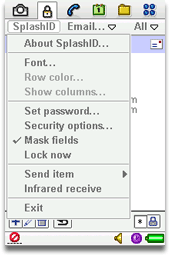
To open the menu options for any screen, tap the SplashID menu.
In the Detail view, this will display the following menu options:
Detail View Options |
- Font -- Select a font style for the Detail View.
- Set Password -- Select Set Password to password
protect SplashID. See Security
for more information.
- Security Options -- Security Options allows
you to specify a period of time after SplashID becomes
idle before the application locks and requires a password.
See Security for more information.
- Mask Fieds -- Check or uncheck to hide
or show the data in masked fields.
- Lock Now -- Locks SplashID immediately and requires
a password to open the data again. See Security
for more information.
- Send Item -- Sends the displayed record to another
device. Note: The recipient must be running SplashID in
order to receive the beamed record.
- Infrared Receive -- Check this setting
to receive beamed records via IR.
|
|
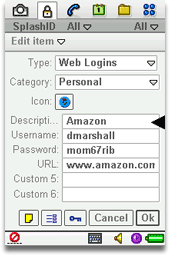
Edit View
Enter the Edit View for a given record by tapping the Edit button
or tapping anywhere on the screen in the Detail
View.
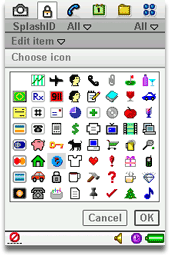
The first two fields in the Edit View are the Type
and Category pickers, followed by the Icon picker, and 6 custom
fields. When you select a given Type, the field labels and icon
will adjust accordingly.
Below the field data area you will find 3 buttons:
Record Info |
Icon Picker |
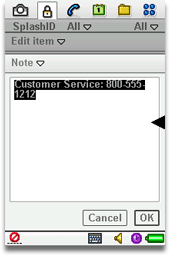
Notes |
|
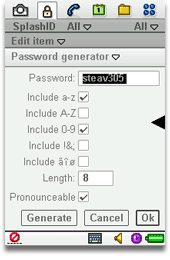
Automatic Password Generator
|
|
|
To bring up the Automatic Password Generator in
Edit View, tap the  button. button.
To create a password:
- Select one or more options of letters, numbers, symbols, or
a combination thereof.
- Set the Length.
- Check or Uncheck the pronounceable setting.
- Tap Generate. Tap again until you get a suitable password.
- Tap OK when you have decided.
|
Edit Types |
Edit Categories |
The difference between Types and Categories is best illustrated
by example. You may use Categories to separate your Business
records from your Personal records, while you use Types
to separate your Credit Card records from your Web Login
records.
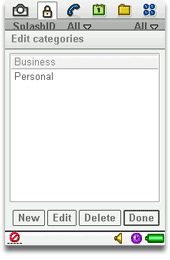
Categories act as filters for grouping related records.
The two pre-defined Categories are Business and Personal,
though you may add more by choosing Edit Categories from
the Category menu. |
|
Types act as templates, which define the structure for the items you
want to store in SplashID. You may define up to 6 custom field labels
and a default icon for each type, as well as specify the fields you
wish to mask. For example, you may create a type for Web Logins, which
includes custom field labels for username, password and URL, with a
globe icon, and the password field masked; and you may create a Type
for Credit Cards which includes custom field labels for credit card
number, expiration date and PIN, with a Visa icon, and the credit card
number and PIN masked.
Define Type
|
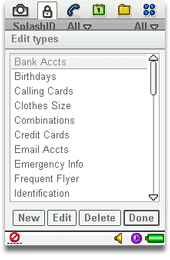
Edit Types -- Select Edit Types from the
type menu to display the Edit Types dialog. You may create an
unlimited number of Types. Several sample Types are provided,
which you may edit or delete. Select an existing type and tap
edit, or tap New to create a new one. The Define type dialog is
displayed.
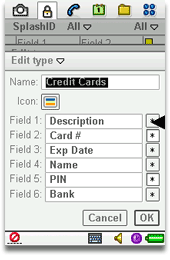
Define Type -- Enter a name for the Type, and choose a
default Icon to be associated with it. Enter up to 6 field labels
for the Type. Tap the
button next to each field that you wish to mask.
|
Default Types
SplashID includes the following built-in Types, which may be modified
or deleted:
| |
Type |
Field 1 |
Field 2 |
Field 3 |
Field 4 |
Field 5 |
Field 6 |
 |
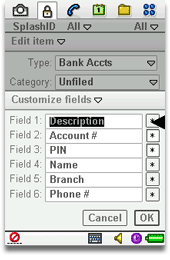
Bank Accounts |
Description |
Account # |
PIN |
Name |
Branch |
Phone # |
 |
Birthdays |
Description |
Date |
|
|
|
|
 |
Calling Card |
Description |
Access # |
PIN |
|
|
|
 |
Clothes Size |
Description |
Shirt size |
Pant size |
Shoe size |
Dress size |
|
 |
Combinations |
Description |
Code |
|
|
|
|
 |
Credit Cards |
Description |
Card # |
Expir. Date |
Name |
PIN |
Bank |
 |
Email Accts |
Description |
Username |
Password |
POP3 Host |
SMTP Host |
|
 |
Emergency Info |
Description |
Phone # |
|
|
|
|
 |
Frequent Flyer |
Description |
Number |
Name |
Date |
|
|
 |
Identification |
Description |
Number |
Name |
Date |
|
|
 |
Insurance |
Description |
Policy # |
Group # |
Insured |
Date |
Phone # |
 |
Memberships |
Description |
Acct # |
Name |
Date |
|
|
 |
Phone Numbers |
Description |
Phone # |
|
|
|
|
 |
Prescriptions |
Description |
Rx # |
Name |
Doctor |
Pharmacy |
Phone # |
 |
Serial Numbers |
Description |
Serial # |
Date |
Reseller |
|
|
 |
Vehicle Info |
Description |
License # |
VIN # |
|
|
|
 |
Voice Mail |
Description |
Access # |
PIN |
|
|
|
 |
Web Logins |
Description |
Username |
Password |
URL |
|
|
Custom Field Labels
|
Field Labels and masking are set by default
when you define a Type. You may
change the Field Labels and masking, however, on a record
by record basis by tapping the Custom Fields button  when in the Edit View.
 |
|
Masking

|
Fields that are Masked appear as four asterisks
(****). You may show or hide the masked data by tapping
the Mask toggle on the lower right corner of the screen.
If you wish to permanently mask or unmask a field for a
given Type, you can change its mask setting in the Edit
Type dialog.
If you wish to change the mask settings for the given record,
you can do this in the Custom Field
Labels dialog. |
|
Set Password Dialog |
Enter Password Dialog |
Security Options |
|
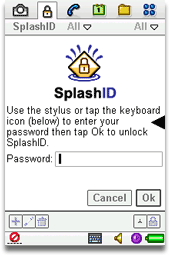
You can secure your data in SplashID so that a password must be entered
to access the application. You will be required to enter the password
when launching SplashID, or when waking your device if SplashID was
last running when it went to sleep. Once you set a password, SplashID
encrypts your data using Blowfish encryption to ensure data security.
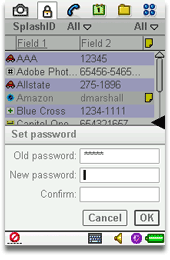
- Setting a Password -- To set a password, select Set Password
from the SplashID Menu in either the List View or Detail View. The
Set Password dialog is displayed. Enter a password in the New Password
field, and verify the password by entering it again in the Confirm
field. Note: You must manually set the
same SplashID password on the phone and the desktop, if you wish
to synchronize between the two.
- Entering a Password -- You will be required to enter your
password each time you launch SplashID, or when you next use your
phone if SplashID was last running when it became idle.
- Changing a Password -- To change a password, select Password
from the SplashID Menu, enter your Old Password, then enter and confirm
the New Password.
- Removing a Password -- To remove a password, select Set Password
from the SplashID Menu, enter your Old Password, then leave the New
Password and Confirm fields blank.
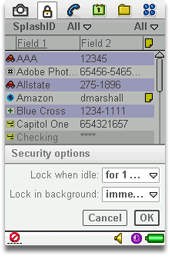
Security Options -- Choose Security Options from the
SplashID menu to specify the period of time that must elapse before
SplashID auto-locks. Once SplashID locks, you must enter your password
to open SplashID. There are two settings for the Security Options:
- Lock when idle -- When the phone becomes
idle, SplashID will lock immediately by default.
- Lock in background -- If you switch to another
application, SplashID will lock immediately by default.
If you wish, you may specify a longer delay, at the risk of less security.
If you have specified a longer delay (e.g., 10 minutes) but then desire
to lock SplashID immediately, you may select Lock Now from the SplashID
Menu or tap the lock button:
You can also lock SplashID by pressing the "#" key
in flip closed mode.
SplashID Desktop is a Windows desktop application that provides identical
functionality to SplashID on your phone. Information is synchronized
between SplashID on the phone and SplashID Desktop using your data
connection. You may find it more convenient to enter your items in SplashID
Desktop using your keyboard and mouse, and then performing a Sync operation
to synchronize the data with SplashID on your phone. SplashID Desktop
is virtually identical to SplashID on the phone, with the following
additional features:
- Auto-Lock -- Select Auto-Lock from the File menu to invoke
the password dialog after a period of inactivity. Note: You must set
a password to enable the auto-lock feature.
- Click-able URLs -- You may click on a URL in the preview
pane to launch your web browser or email client.
- Copy field -- You may click the clipboard icon next to a
field in the preview pane to copy that field to the clipboard. You
may then paste this field into another application (e.g., copying
and pasting the password field from SplashID into a web browser).
Note: You many also type Control-1 through Control-7 to copy fields
1 through 7 to the clipboard.
- Import/Export -- You may transfer data to/from SplashID Desktop
(see Import/Export).
- Backup/Restore -- Manually make backups of your
data, or restore data from a backup file. (see Backup
and Restore).
- Printing -- You may print the currently displayed items.
Sync Settings
Select Sync Settings from the Sync Menu to modify your synchronization
settings.
- Auto-Synchronize at launch and exit: This option
will cause the Desktop to perform a sync with the phone whenever you
launch or exit the desktop app.
- Synchronize the files: This is the default setting
for SplashID and synchronizes the data on the phone with that on the
desktop. Changes to the desktop data will be changed on the phone,
and vice-versa. Note: There is a checkbox for Slow Synching available
when you have set the preference to Synchronize. Slow Synching is
not recommended unless you synchronize with multiple desktop computers,
and are having technical problems.
- Desktop overwrites handheld: The phone data will
be overwritten by the desktop data. This is useful if you have accidentally
deleted a record from the phone, but it still resides on the desktop.
- Handheld overwrites desktop: The desktop data
will be overwritten by the phone data. This is useful if you have
accidentally deleted a record from the desktop, but it still resides
on the phone.
You can share information with other SplashID Desktop users by exporting
and importing your SplashID records. Records can be exported/imported
on the desktop in several formats:
SplashID vID
You may import and export SplashID records in SplashID Virtual ID (vID)
format, which allows you to export and import records in a secure, encrypted
format. vID files may be encrypted by assigning a password when exporting.
The recipient of the vID file may import the data into their copy of
SplashID Desktop by double-clicking the file, or choosing Import/SplashID
vID from the File Menu. If a password was assigned to the file, the
recipient must enter the password in order to import the data.
vID files are a convenient way to share records with a coworker or
spouse by exporting a vID file, assigning a password (optional), and
then emailing the resulting vID file to the recipient. You can even
use the vID format as a backup mechanism by periodically exporting a
vID file and archiving it on a backup disk.
CSV
You may also import and export SplashID records in CSV format. CSV stands
for Comma Separated Values, and is a common file format readable by
most spreadsheets, databases and word processors. If you wish to import
a CSV file, the data must be in the following format:
Type, custom 1, custom 2, custom 3, custom 4, custom 5, custom 6, Notes,
Category
It is easy to create the above format in Excel by creating a spreadsheet
with 8 columns (as designated above) with one record per row. Then save
the file in CSV format.
Note: When importing data, if the type field is blank the record will
be placed in Unfiled. If there is a type name and it does not match
an existing type a new type will be created.
SplashID data is stored on both the phone and the desktop, and each
acts as a backup of the other. So, in effect, if you lose the data on
one of these devices through a catastrophic event (e.g., hard drive
failure), the data will be restored to that device from the other device
during your next Sync.
Automatic vID Backups
SplashID Desktop has an automatic backup feature which will allow
you to easily recover data in most cases. Whenever the data has been
changed, a backup is made each time you exit SplashID Desktop. A vID
export file is created (and encrypted with the same password you are
using in SplashID) and stored in:
My Documents\SplashData\SplashID\Backup\SplashID-Symbian-UserName.vid
If you later need to restore this data, simply double-click the .vid
file and you will be prompted for a password and the data will be imported
into SplashID Desktop.
Manual vID Backups
You may also perform a manual backup of your data by selecting Backup
from the File menu. This will export your SplashID Database in vID format
to whatever location you select. You will be given the option to set
a password as well, which will encrypt the data and require the password
to restore it.
Restore
Select Restore from the File menu to restore a vID file that has
been backed up either automatically or manually as described above.
The password will remain the same for the application even if the password
for the backup file was different.
Desktop
The SplashID Desktop database file is automatically saved to the
My Documents directory on your hard drive each time you exit the application.
You may back up this file as an added precaution in case of a hard drive
failure. To restore the backup file simply copy it into the SplashID
directory. Then the next time you launch SplashID it will open the file.
This file is stored here:
My Documents\SplashData\SplashID\<IMEI Number>\SplashID
Database.sdb
You may change the location of the SplashID Desktop database file by
selecting Change Database Location from the File menu and selecting
a different directory. You may choose a local directory on your computer
or a network directory. If the desktop database file is unavailable
during a sync operation the SplashID synchronization process will be
skipped. |