 |
SplashPhoto for
BlackBerry User Guide
|
Introduction
SplashPhoto is a fast, easy to use image viewer for the
BlackBerry. SplashPhoto allows users to organize images on their
handhelds for individual or slideshow viewing. It is designed to
provide optimal image viewing within the confines of a handheld's
reduced display size and limited memory. In addition, SplashPhoto
includes desktop software that synchronizes with the handheld,
for editing, optimizing, installing, organizing and cataloging
images. |
Installation
Connect your BlackBerry to your desktop computer. Run the Installer
and follow the on screen instructions. The installer installs the
following files:
- SplashPhoto.alx and SplashPhoto.cod -- The application
used to view and edit information on the BlackBerry.
- SplashPhoto Desktop -- A desktop application used to view
and edit information on the desktop.
- SPPlatformMgr.dll and SP_BB_SyncProvider.dll --
Extensions for the Desktop application.
- SplashPhoto User Guide -- This User Guide.
To complete installation, connect your BlackBerry to your desktop
as you normally do to sync.
- Launch the BlackBerry Desktop and double-click the Application
Loader.
- Click the Add button and browse to select this file:
c:\Program Files\SplashData\SplashPhoto for BlackBerry\SplashPhoto.alx
- Scroll down through the list of programs and check the box
at the bottom for SplashPhoto to be installed.
- Click Next and SplashPhoto will be installed on the device.
- On your handheld, find the SplashPhoto application and launch.
It may be found in the Applications folder.
To enable synchronization, double-click the Intellisync icon in
the BlackBerry Desktop:
- In the top section of the Intellisync window, check the box
that reads "Execute Add-in actions."
- In the bottom section, click the button that reads "Configure
Add-ins."
- Check the box that reads "SplashPhoto Intellisync Add-ins" then
click OK.
- Click the Synchronize now button to perform a first sync.
|
Registration
When you launch SplashPhoto you will be prompted to enter a registration
code or to run in Trial mode. You may run the software for 30-days
in full-functioning Trial mode. The Trial software and Registered
software are identical. Once the trial period ends you must purchase
and enter a registration code to continue using the software. You
do not need to re-install the software. Simply enter a registration
code and your Trial version will be converted into a Registered
version and all images will remain intact. |
| Quick Start
- Connect your device to your desktop.
- Launch the SplashPhoto Desktop application.
- Drag images into the SplashPhoto application window to add
them to your catalog. Or click the Add button in SplashPhoto to
browse for images.
- The Edit dialog will automatically open for each image you
have added. You may edit the Name, Category, Zoom, Contrast,
Brightness and cropping of each image. Click Next to page through
the series of images you just added. Click Done when your changes
are complete. The catalog displays the images you have added.
- Close SplashPhoto and open the BlackBerry Desktop manager.
- Double click the Intellisync icon, and then click the Synchronize
Now button.
- Launch SplashPhoto on the handheld and view the images!
|
SplashPhoto Desktop
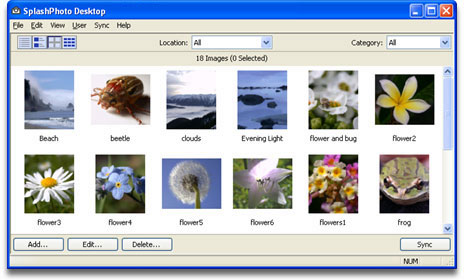
The SplashPhoto desktop application allows you to add or remove
images from your SplashPhoto catalog, categorize and add notes to
images, crop and edit those images, and then synchronize the changes
with your handheld.
Launch SplashPhoto Desktop to access your image catalog.
Installing Images
To add an image to your catalog, either click the Add button or
drag an image file into the application window from somewhere on
your computer. Supported image types include JPG, GIF, and BMP.
SplashPhoto will convert all images to JPG format.
When you add an image to the catalog, the Edit
Dialog opens so you can adjust the Image Details of each image
added.
Once you have finished editing the Image Details, click Sync and
the images in your catalog will be synchronized to the handheld. |
Edit Dialog
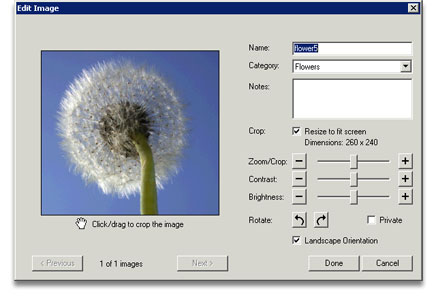
- Name: Change the name of the image.
- Category: Assign the image to a category.
- Notes: Add any additional information.
- Crop: Check this box to automatically
crop the image and resize it to fit your device’s screen.
Leave this unchecked to install the full size image.
- Zoom/Crop: Use the slider to adjust the
size and cropping of the image. Then click and drag on the
image preview to adjust the crop.
- Contrast: Use the slider to adjust how
sharp the image is.
- Brightness: Use the slider to adjust how
bright the image is.
- Rotate: Click the buttons to rotate 90
degrees in either direction.
- Landscape Orientation: You have the option
of changing the orientation from Portrait to Landscape.
- Previous/Next: If you have selected multiple
images, these buttons will move forward or back through the
series of images.
- Done: Click Done if you have made all
of the edits you wish to make for the entire series.
- Cancel: This clears any edits you have
made to the current image and returns to the image catalog.
|
|
Browsing
the Desktop Catalog
When you open SplashPhoto Desktop, your handheld user name
will appear at the top of the window. If you sync with more
than one handheld, you may change users by clicking on the User
menu and selecting a different user name.
You can view your images on the desktop a number of different
ways. At the top left of the SplashPhoto Desktop window, there
are 4 view buttons available:

- List View: Displays all of the details
of the images in a list. The columns displayed can be changed
by choosing Show Columns from the Edit menu.
- Detail View: Displays Thumbnail, Name,
Category, Dimensions, Size, and Notes. Note: The Detail View
is particularly useful for changing an image's
category.
- Thumbnail View: Displays large thumbnails
and the image Name.
- Gallery View: Displays small thumbnails
only.
These view options are also available from the View Menu.
The pull-down menu in the top right allows you to filter by
the Category of the images. You can also select Edit Categories
from the pull-down list and add, delete, or change the categories
you can select from.
|
Desktop Preferences
The Preferences for the SplashPhoto Desktop allow you to set
a default action for adding images to the catalog. Access the
Preferences from the Edit menu.
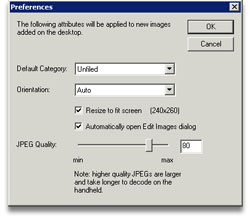 |
Set the Category for new images added
to the catalog.
Note: The default category are applied to
new images when viewing All images. If you are filtering
the catalog by a specific category when you
add images to the catalog, that category
will be applied to the new images.
Set the Orientation for new images. Auto
orientation will automatically select the appropriate orientation
to match the aspect ratio of the image.
The check box for Resize to fit screen
is the same option as in the Edit Dialog.
It automatically crops the picture to best fit the handheld
screen. Unchecking this will install the full size image.
|
The check box for Automatically open Edit Images
dialog allows you to bypass the Edit Dialog.
This is especially useful if you have set a default action for
all images and want to have these settings automatically applied
to each image without having to preview each image.
Finally, there is a slider to adjust the quality/compression
of the JPGs that will be installed on your device. Higher quality
means larger image files, requiring more memory on the device
which may take longer to display.
Editing Multiple Images
You can select multiple images by shift-clicking or control-clicking
them in the catalog, and select Assign Category from the File
menu to apply the same category to all of the images. And you
can delete a group of images by clicking the Delete button. |
Browsing the Handheld Catalog
On the handheld, launch SplashPhoto from the Applications Screen.
Browser Views
| You can view your
images on the handheld a number of different ways. There
are 4 Browser View modes you can switch between by selecting
the View line and pressing the Click Wheel, and selecting
Change Option:
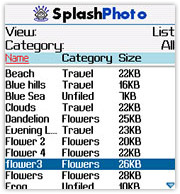
• List View: Displays the Name and
Category of each image in a list format. The columns displayed
can be changed in Preferences.
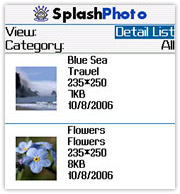
• Detail List View: Displays Thumbnail,
Name, Category, Dimensions, Size, Date and Notes.
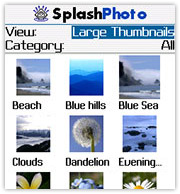
• Large Thumbnail View: Displays
large thumbnails and the image Name.
• Small Thumbnail View: Displays
small thumbnails only. |
List View
|
Detail View
|
Large Thumbnail View
|

Small Thumbnail View
|
|
Menus
Options Menu
The following commands are available from the Options Menu.
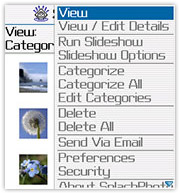 |
View -- Opens the image in Full
Screen View.
View/Edit Details -- Opens the Image Details dialog
for the selected image.
Run Slideshow -- Begins a slideshow with the selected image.
Slideshow Options -- Used to alter Slideshow
Options.
Categorize/Categorize
All -- Assigns the selected image/all images to a
Category.
Edit Categories -- Opens the Edit
Categories dialog.
Delete/Delete All -- Deletes the selected image
/ Deletes all displayed images.
Send Via Email -- Opens a new email with the selected image attached. (Existing
email account setup required).
Preferences -- Opens the Preferences dialog.
Security -- Opens the Security dialog where you can
hide or show images marked Private.
About SplashPhoto -- Information
about SplashPhoto including the version number.
Exit -- Exits SplashPhoto. |
|
Preferences
You can access Preferences on the phone by selecting it from
the Options Menu in the Browser View.
 Sort
By: Select an attribute to sort by. Sort
By: Select an attribute to sort by.
Sort Direction : Select to sort Ascending
or Descending.
Show columns: Select which attribute to
display in the extra column in list view (Category, Size,
Dimensions, Date, or Note)
|
Security
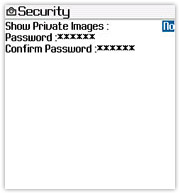 |
You can mark an image as Private to hide that
image from view. Mark an image private either in
the SplashPhoto Desktop or
in the Image Details on the
handheld.
To hide images marked Private:
- Open SplashPhoto and choose Security from the Options
Menu in any of the browser views.
- Change the option for Show Private Images.
You can also set a password that will be required
to unhide private images once you have set it.
Note: All images marked Private will remain hidden
until you change the Security setting back to Show
Private Images. |
|
|
Categories
 By
selecting the
Category line and pressing the Click Wheel, then Change Option,
you can change the Category by which you are filtering. By
selecting the
Category line and pressing the Click Wheel, then Change Option,
you can change the Category by which you are filtering.
You can also select Edit Categories from the menu to add, delete,
or rename categories.
|
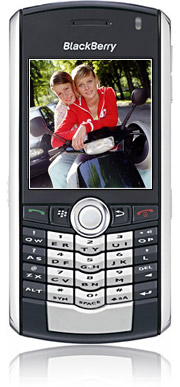
Image View
 |
Full Screen View
To view a full screen image, select an image and press
the Click Wheel, and select View. Page through the images
by scrolling with the Click Wheel.
Press the Escape key to exit back to one of the Browser
views.
Press the click wheel to open the Options
Menu. |
|
Image View Options Menu
 There
is a different menu available from Image View mode which looks like
this: There
is a different menu available from Image View mode which looks like
this:
Browser View: Exits full screen view.
View/Edit Details: Displays the Image
Details dialog.
Zoom: Enters Zoom Mode. (only
available on images that are larger than the screen)
100%: Displays the image
at its full resolution. (only available
on images that are larger than the screen)
Categorize: Displays a list of categories to assign the
image to.
Edit Categories: Opens the Edit Categories dialog.
Delete: Deletes the image.
Exit: Closes the SplashPhoto application. |
Image Details
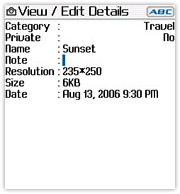 In
the Image Details dialog you can review and modify the image attributes. In
the Image Details dialog you can review and modify the image attributes.
Category -- You can assign each image to one of
the user-definable categories.
Private -- Change this option to mark the image
private. It will be hidden if Security settings
are correctly set.
Name -- Use this field to rename the image.
Note -- Enter any additional details about the image.
Resolution -- Displays the resolution of the image.
Size -- Displays the file size of the image.
Date -- Displays the date the image was created. |
Slideshow
|
Select Run Slideshow from the Options
Menu to start a slideshow. All of the images currently
in view will be displayed in the slideshow and the slideshow
will start from the currently selected image. Images will
be displayed according to your Slideshow
Preferences.
Stop the slideshow by pressing the Escape key. |
|
Slideshow Preferences
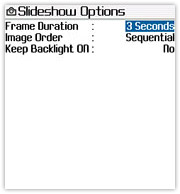 Access
the Slideshow Preferences on the handheld by choosing Slideshow
Preferences from the Options Menu in
the browser. Access
the Slideshow Preferences on the handheld by choosing Slideshow
Preferences from the Options Menu in
the browser.
Frame Duration: Select the length of time you
would like each image to display during a Slideshow. You can set
the duration to Manual as well, and use the Click Wheel to page
through the images at your own pace.
Image order: Select
whether you would like the images displayed in Sequential order
or Random.
Keep Backlight ON: The phone will turn off the backlight after a
given period of time, but SplashPhoto keeps it on during Slideshows
by default.
|
|